How to Look for a File in Windows 10
For better or worse, you've upgraded to Windows 11 or performed a Windows 11 clean install, but that doesn't mean you have to live with all aspects of the new user interface. Perhaps, like me, you hate the new Start Menu because it gives you fewer icons while taking up more space. Maybe you're enraged that the right-click menus only show you about seven options at a time -- and not necessarily the best seven -- and then make you click "Show more options" to see them all. Or you might just want the ribbon back in Windows Explorer.
The good news is that, with a combination of registry tweaks, third-party apps and some different art work, you can get a lot of the look and feel of Windows 10 back in Windows 11. The bad news is that Microsoft doesn't seem to want you to go back to a previous UI so it may disable any registry hacks you use in future updates.
Below, we'll outline a number of tweaks for different parts of the UI and you can use one, several, or all of them to get the look you want.
Windows 11's Start Menu is a crime against productivity. It is at least 100 pixels taller than Windows 10's, yet contains fewer icons and forces you to click an "All apps" button in order to get a scrollable, alphabetic list of your programs. We have a more detailed tutorial on how to replace the Windows 11 Start menu, but your main choices are as follows:
- Start11: Our favorite Start menu replacement costs $5.99, but gives you the most Windows 10-like interface, along with the option to move the taskbar to the top of the screen or change the size of the icons. There's a 30-day free trial so you can see for yourself.
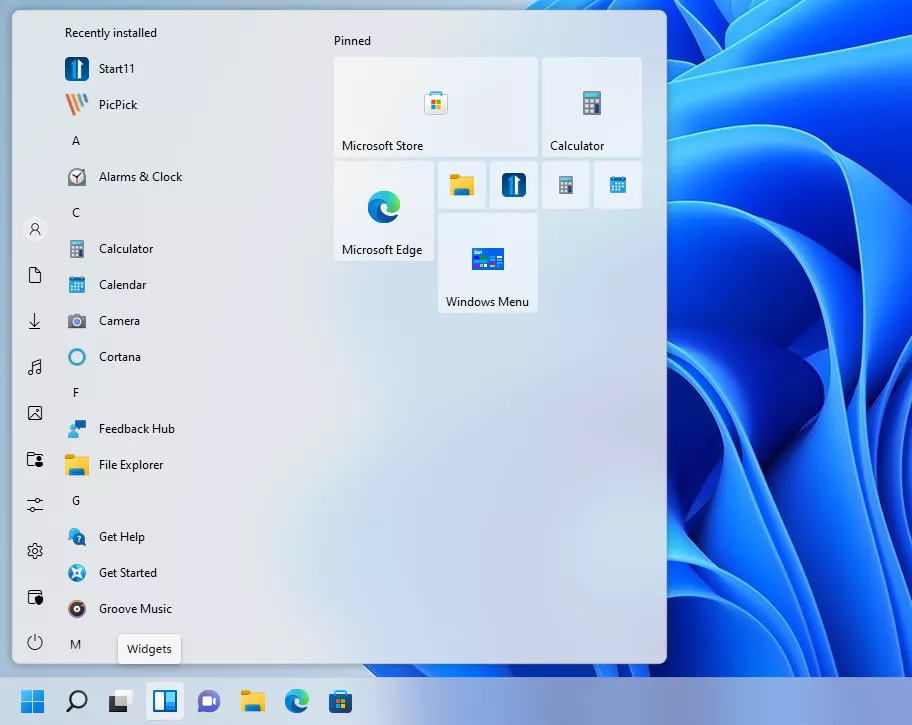
- StartAllBack : This $4.99 Start Menu replacement has more of a Windows 7-like UI, but it gives you some options that Start11 does not, including the ability to ungroup taskbar icons, or enable classic context menus, both of which you can do via registry hacks if you don't get this.
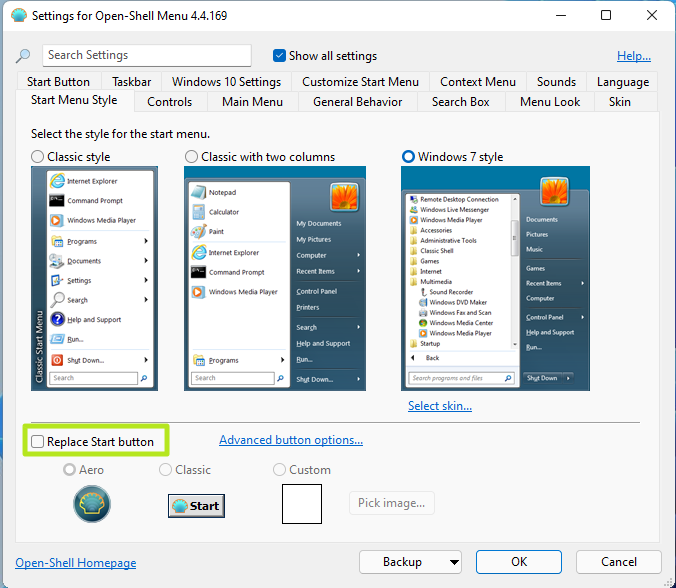
- Open-Shell: This is a free, open-source Start Menu alternative but it also proves that you sometimes get what you pay for. It has the most primitive interface and, since it hasn't been updated to work explicitly with Windows 11, offers the fewest customization options. If you want
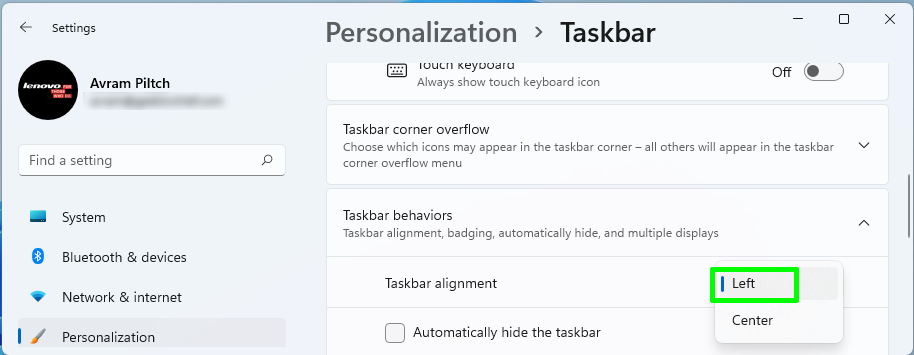
If you install Open-Shell and don't want to have the bugs you get from bringing back the classic taskbar -- an option which we'll get to below -- all you need to do after setting up the program is to shift the taskbar icons to the left. To do that, just right click on the taskbar, select Taskbar Settings and then navigate to Taskbar Behaviors and choose Left from the alignment menu.
Your Start button, which looks like a shell unless you upload a custom one, will then cover the Windows 11 button, and it will work.
However, if you want to use Open-Shell and get the accurate Windows 10 Start button icon, you will need to restore the Windows 10 classic task bar and set Open-Shell not to Replace the Start button. The classic taskbar has its own Windows 10 Start button, so it will use that.
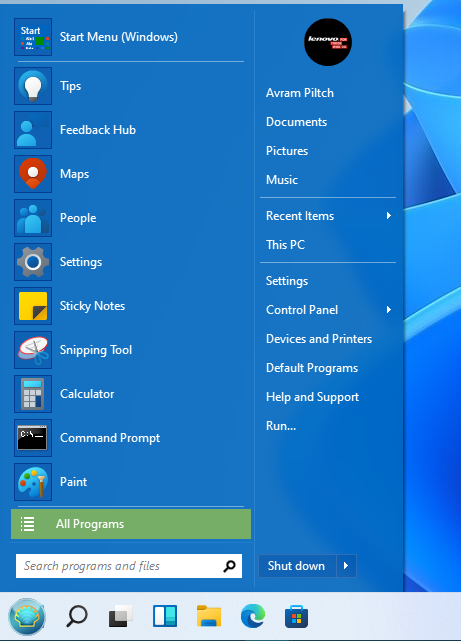
Get Windows 10's Classic Taskbar
If you use Start11 or StartAllBack, you will have some options that allow you to get a more Windows 10-like experience from the taskbar. For example, StartAllBack, allows you to ungroup taskbar icons and Start11 lets you move the taskbar to the top of the screen while both let you resize the icons.
If you are not using either of those Start menu replacements or you want a more classic-looking Windows 10 taskbar, there is a registry tweak that replaces the Windows 11 bar with the Windows 10 one. However, many of the icons on this bar don't work and need to be hidden or disabled, making this a less-than-perfect option.
There's a search box, but clicking it does nothing, and you may see a Cortana button that does nothing. The Task View button is worse than useless as it crashes when you click it, causing the taskbar to hide your icons for a minute or two while it recovers, so you should hide it also. Considering that the Windows 11 taskbar's Task View and search buttons work, this is a loss of functionality. However, you can search directly from the Start menu and hit Windows key + Tab to get the Task View menu.
You also must have a third-party Start menu installed, because clicking the Start button on the classic taskbar will do nothing on its own.
On the bright side, enabling the classic taskbar also gives you back the Windows 10 File manager (with ribbon) and the Windows 10 right click context menus. However, if you don't use the classic taskbar, you can get those back in another way, which we'll explain in a section later. It also allows you to unlock the taskbar and drag it to the sides or top of the screen.
If you're willing to live with the downsides, here are the steps for getting the Windows 10 taskbar in Windows 11. Make sure a third-party Start menu app is installed before you take these steps.
1. Open Regedit. You can get there by hitting Windows key + R and typing regedit into the run box.
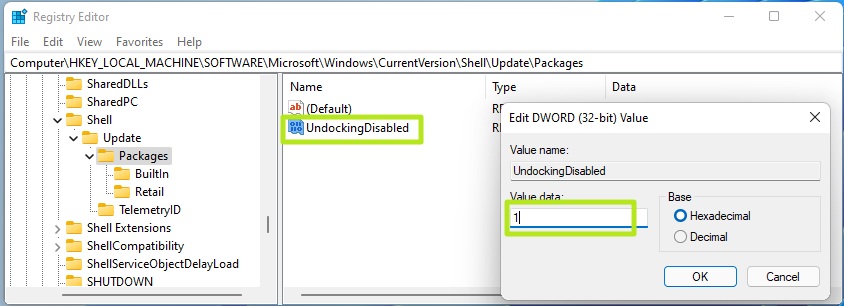
2. Navigate to HKEY_LOCAL_MACHINE\SOFTWARE\Microsoft\Windows\CurrentVersion\Shell\Update\Packages
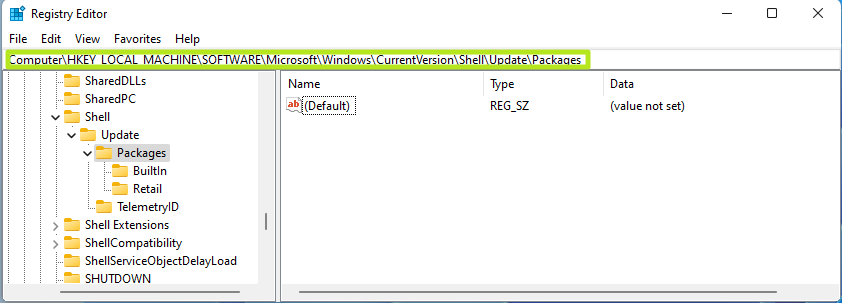
3. Create a DWORD (32-bit) Value called UndockingDisabled and set its value to 1. You create new values by right-clicking in the right pane of Regedit and selecting New->DWORD (32-bit) Value, then renaming the entry to the appropriate name and double-clicking on it to get the value dialog box.
4. Close Regedit and restart Windows. You'll now have the classic Windows 10 Start menu and, if you installed your third-party Start menu, a working Start menu that is more compact than Windows 11's and has a built-in search function.

However, you'll notice that the clock, volume control and network icons are missing from the right side of the taskbar. You'll want to get them back.
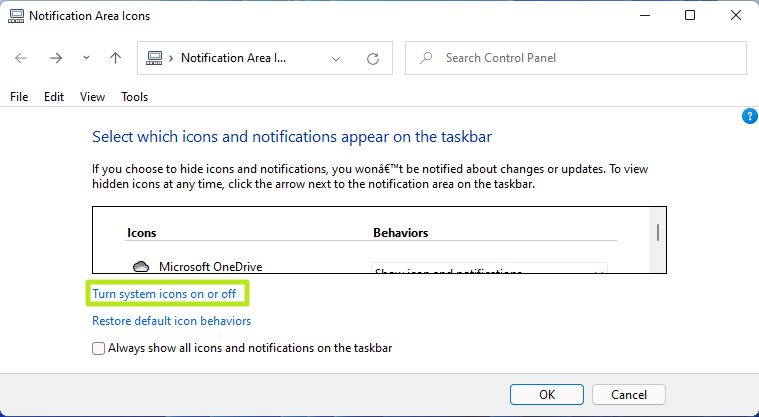
5. Hit Windows key + R and enter shell:::{05d7b0f4-2121-4eff-bf6b-ed3f69b894d9} to launch the notification control panel.
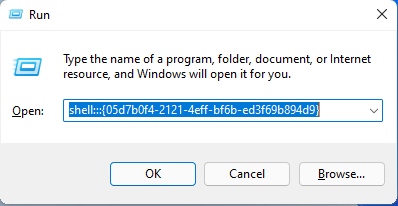
6. Click "Turn system icons on or off."
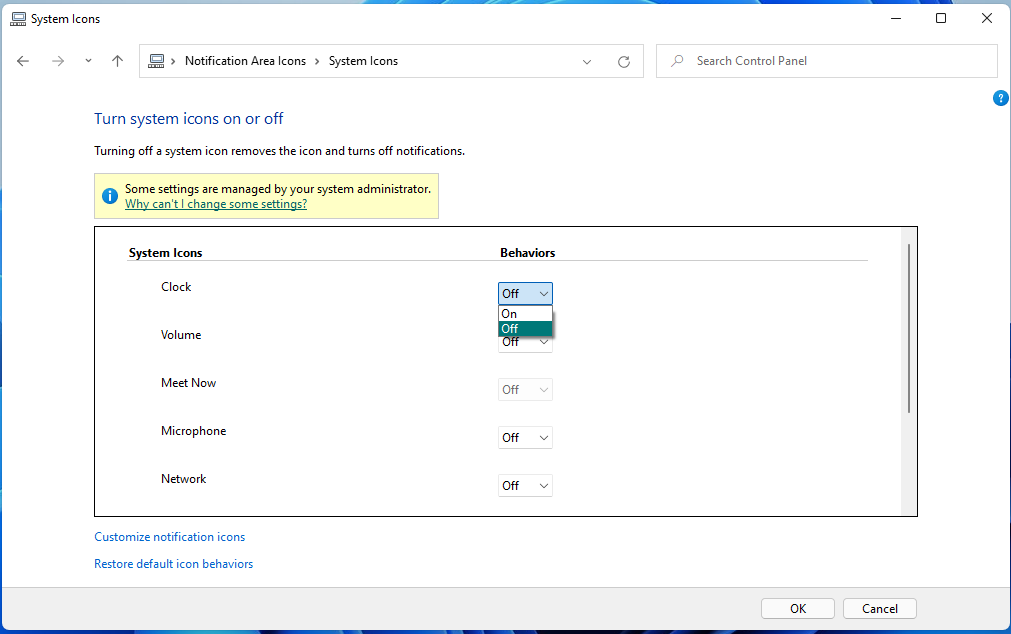
7. Toggle Clock, Volume and Network to On then Click Ok.
You'll have those icons back on the right side of the taskbar, but next, you should hide the icons you can't use, particularly the Task View button that crashes when you click it.
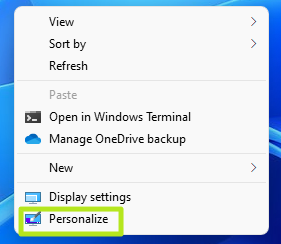
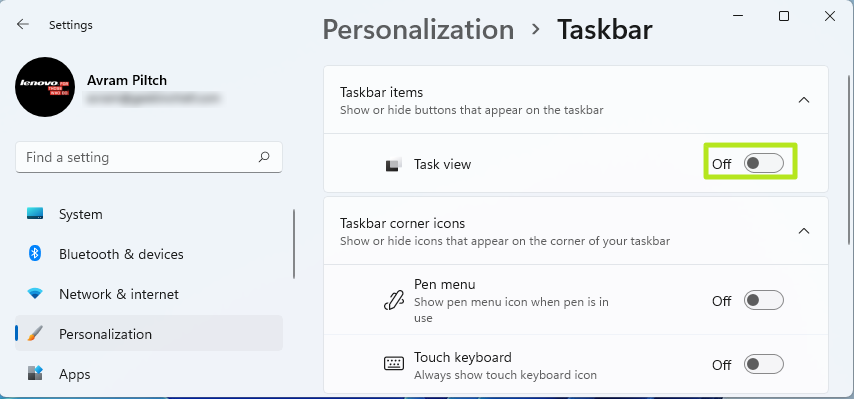
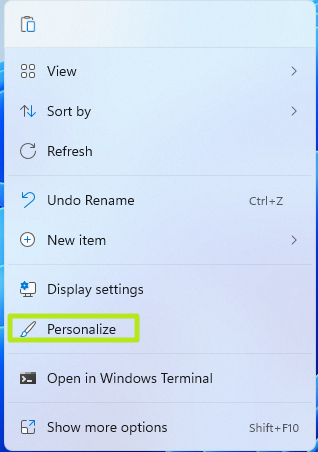
8. Right click on the desktop and select Personalize.
9. Open the Taskbar submenu.
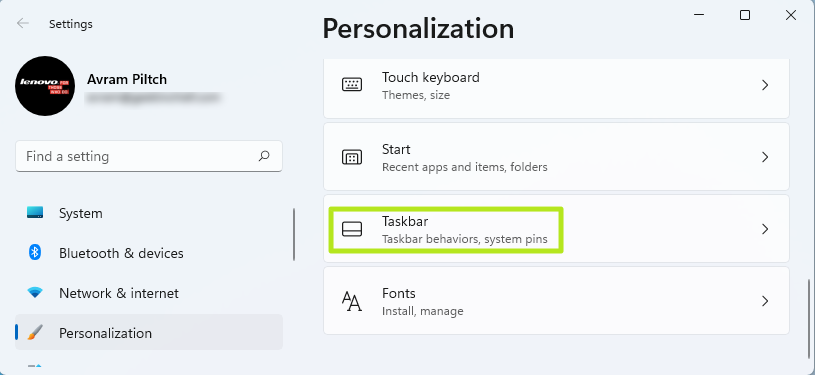
10. Toggle Task View to off.
If you really want to, you can leave the search box and/or Cortana button in place since they don't cause any harm, but they also don't do anything, so you'll probably want to hide them.
11. Right click the taskbar and highlight Show Cortana button to make it disappear.

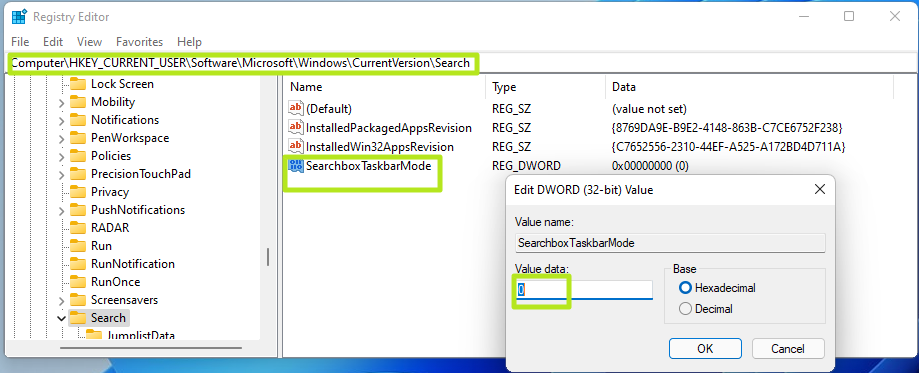
12. Open Regedit and navigate to HKEY_CURRENT_USER\Software\Microsoft\Windows\CurrentVersion\Search
13. Set Searchbox TaskbarMode to 0.
14. Close Regedit and restart Windows.
Ungrouping Taskbar Icons
One Windows 10 feature you might miss is the ability to maintain separate taskbar icons for each of your windows. By default Windows 10 and 11 both combine all your windows from a particular program -- for example, your web browser -- into a single icon, which you must hover over to see the window titles. However, in Windows 10 and -- if you use one of the hacks below -- you can change this behavior.
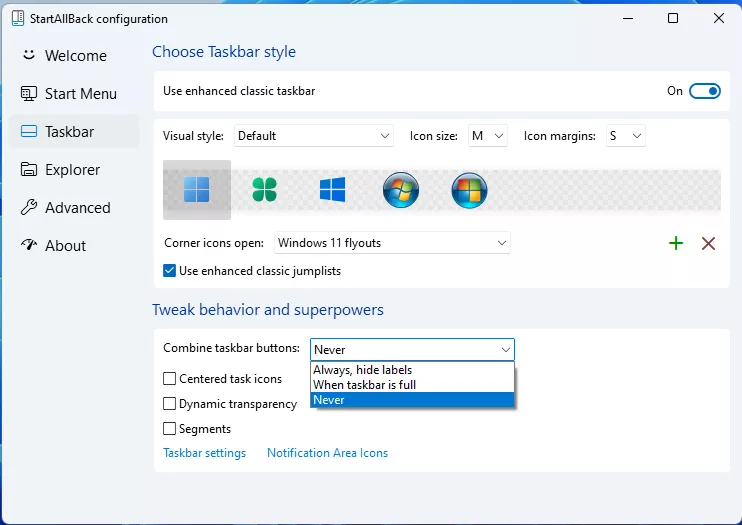
The best way to ungroup taskbar icons is to install StartAllBack and select "Never" from the Combine Taskbar buttons menu on the Taskbar tab.
If you don't use StartAllBack and you do have classic taskbar enabled (see above), you can ungroup the icons with a registry tweak as follows.
1. Navigate to HKEY_CURRENT_USER\Software\Microsoft\Windows\CurrentVersion\Policies\Explorer in Regedit.
2. Create a DWORD (32-bit) Value called NoTaskGrouping, if it doesn't already exist, and set it to 1. (h/t to user Dacrone on the Windows Eleven Forum for sharing this).
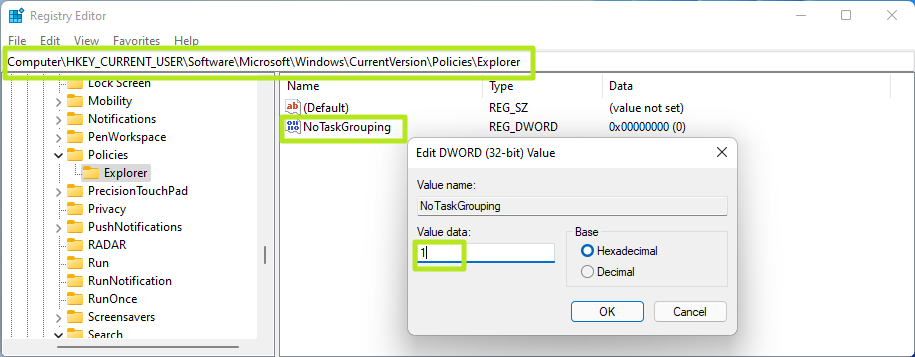
3. Close Regedit and restart Windows.
You should now see separate icons for every window you have, including and especially browser windows.

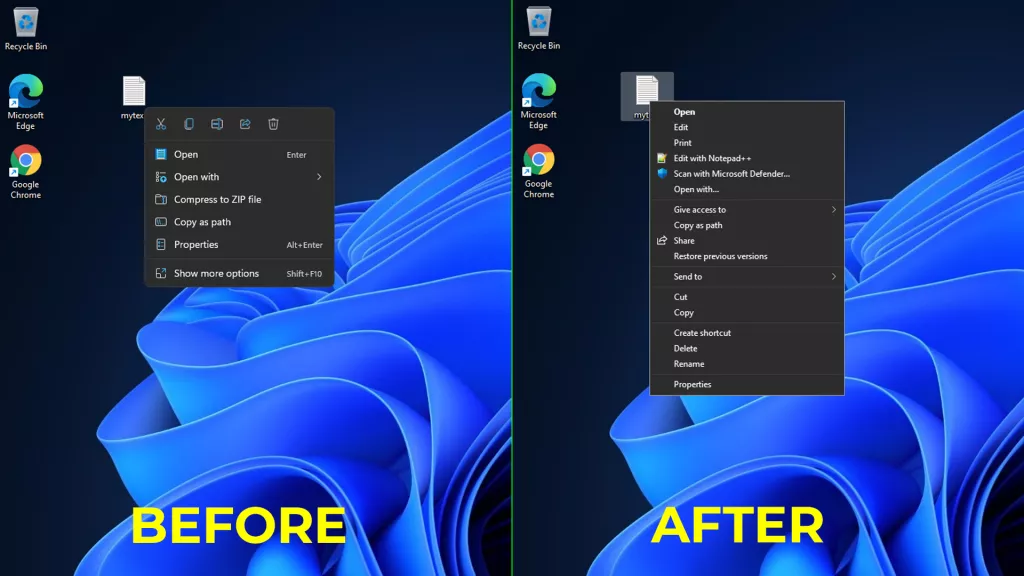
Windows 11's greatest crime against usability is its limited context menus which only show you a few options when you right click and often leave out the most important ones. For example, when I tried right clicking on a .txt file, Windows 11 did not give me an option to open it in Notepad++, a popular text editor I had installed. Of course, Windows 11's solution to this problem is to make you click a "Show more options" link which then gives you the classic context menu.
However, as we explain in our article on how to get full context menus in Windows 11, there's a simple registry tweak that will bring the whole menu back. See our article for all the steps, but in brief you need to create a registry key called {86ca1aa0-34aa-4e8b-a509-50c905bae2a2} under HKEY_CURRENT_USER\Software\Classes\CLSID and then create another key under that called InprocServer32 and finally set the Default value there to a blank space.
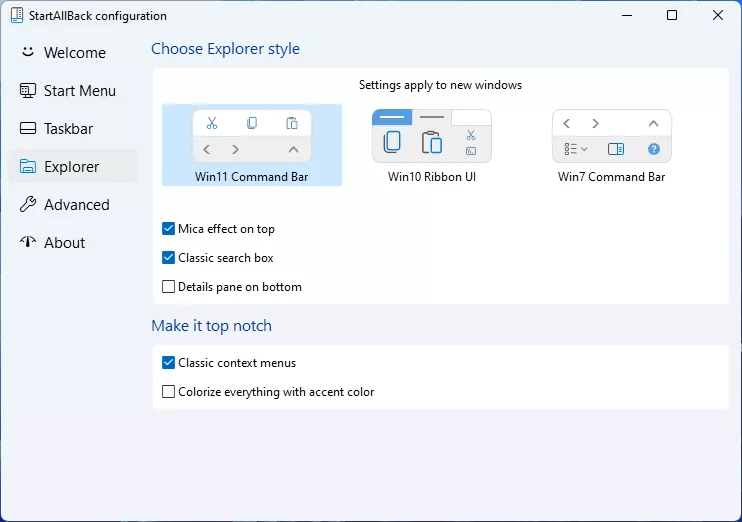
If you have StartAllBack, you can also enable classic context menus from the Explorer tab.
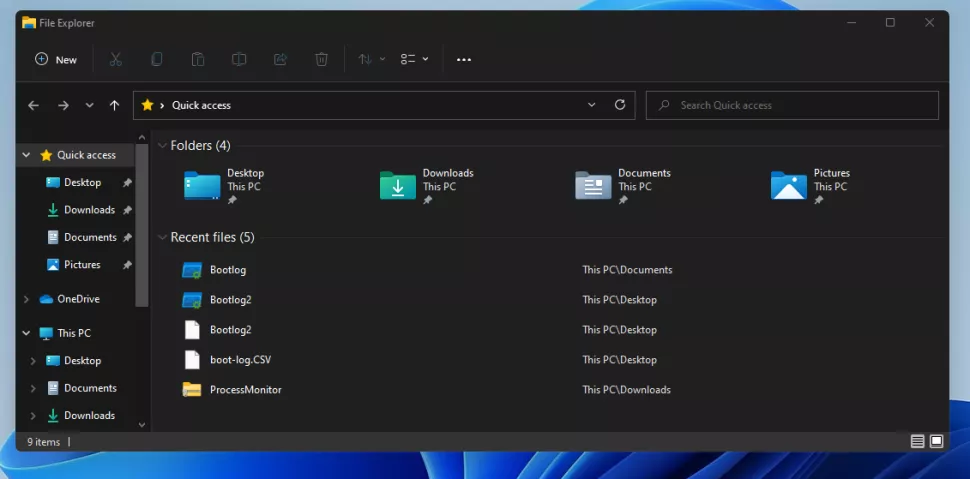
Get Windows 10 File Explorer
Windows 11's File Explorer lacks the helpful ribbon menu you see in the Windows 10 version. That's annoying because many key functions, while still available, aren't as easy to find.
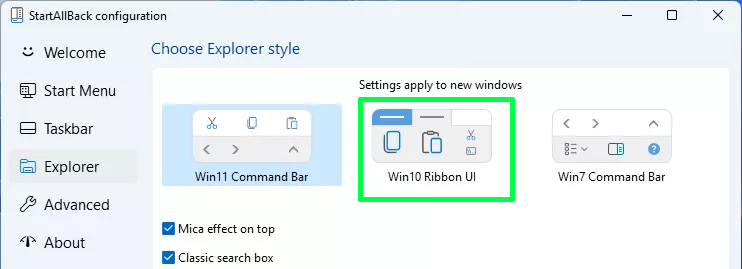
There are a couple of ways to get the old, ribboned Windows 10 File Explorer back. If you use StartAllBack, you can enable Win 10 Ribbon UI in the Explorer tab.
However, if you don't use StartAllBack, there are some registry tweaks you can employ to get Windows 10's File Explorer in Windows 11.
If you've already turned on the Windows 10 classic taskbar by navigating to HKEY_LOCAL_MACHINE\SOFTWARE\Microsoft\Windows\CurrentVersion\Shell\Update\Packages and setting UndockingDisabled to 1, the classic File Explorer and context menu are already enabled.
However, if you choose not to use the classic taskbar, you can still get them back by following these steps (h/t to Winaero for discovering this).
1. Navigate to HKEY_LOCAL_MACHINE\SOFTWARE\Microsoft\Windows\CurrentVersion\Shell Extensions in Regedit.
2. Create a new registry key called Blocked if it doesn't already exist.

3. Create a String Value named {e2bf9676-5f8f-435c-97eb-11607a5bedf7} in the HKEY_LOCAL_MACHINE\SOFTWARE\Microsoft\Windows\CurrentVersion\Shell Extensions\Blocked key.
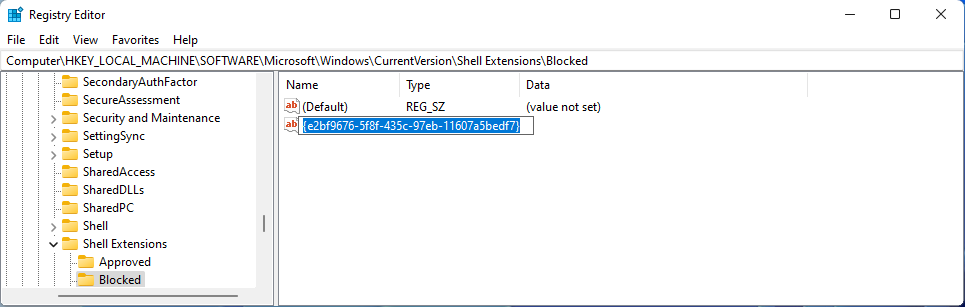
4. Close Regedit and restart Windows.
Get Windows 10 Wallpaper in Windows 11
One of the most non-Windows things about Windows 11 is its default wallpaper, which looks like some kind of flower. Unfortunately, the other preloaded wallpapers aren't much better as none of them has the famous Windows logo on them.
So, even though it is a minor change, getting the default Windows 10-branded wallpaper on your Windows 11 desktop will really make it look and feel like the older OS. To get the Windows 10 wallpaper in Windows 11:
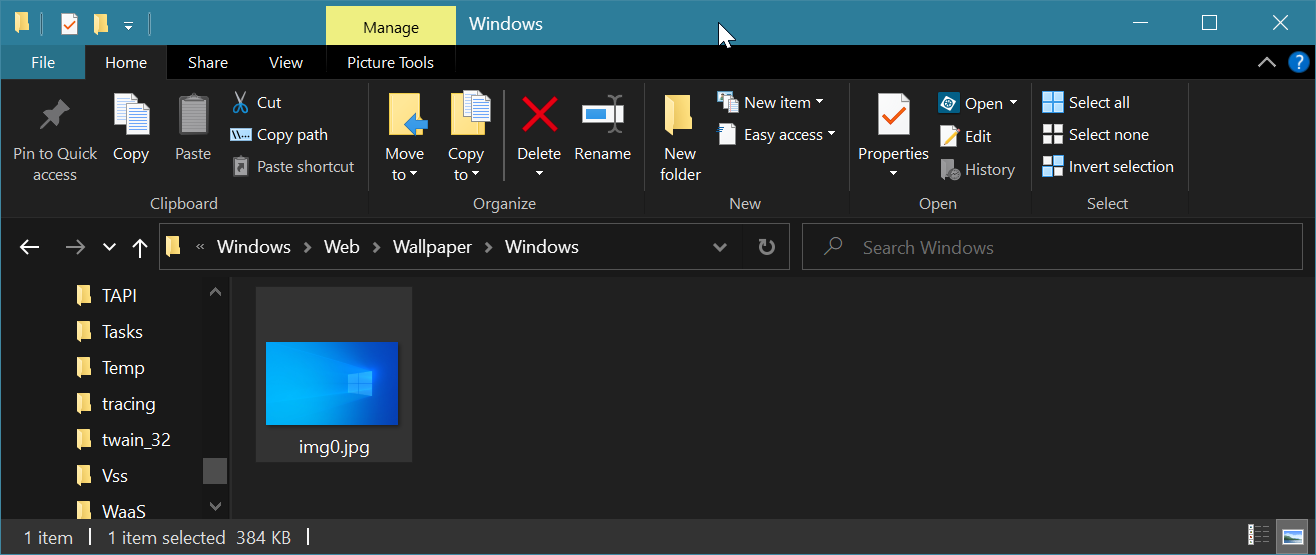
1. Get the Windows 10 wallpaper and copy it to your Windows 11 PC. If you still have access to a PC with Windows 10 installed, or perhaps you still have the Windows.old folder on your Windows 11 PC, you can find the Windows 10-branded wallpaper in C:\Windows\Web\Wallpaper\Windows as img0.jpg. If you don't have access to Windows 10, you can find copies of the wallpaper on sites like WallpaperCave.
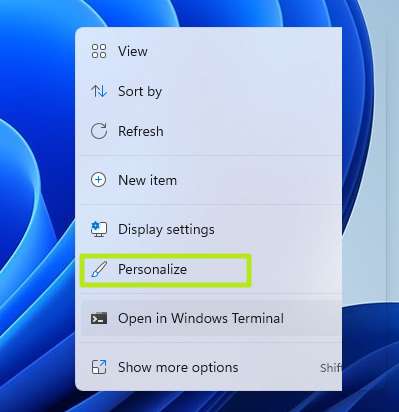
2. Right click on the desktop and select Personalize.
3. Open the Background submenu.

4. Click Browse Folders and select the file.
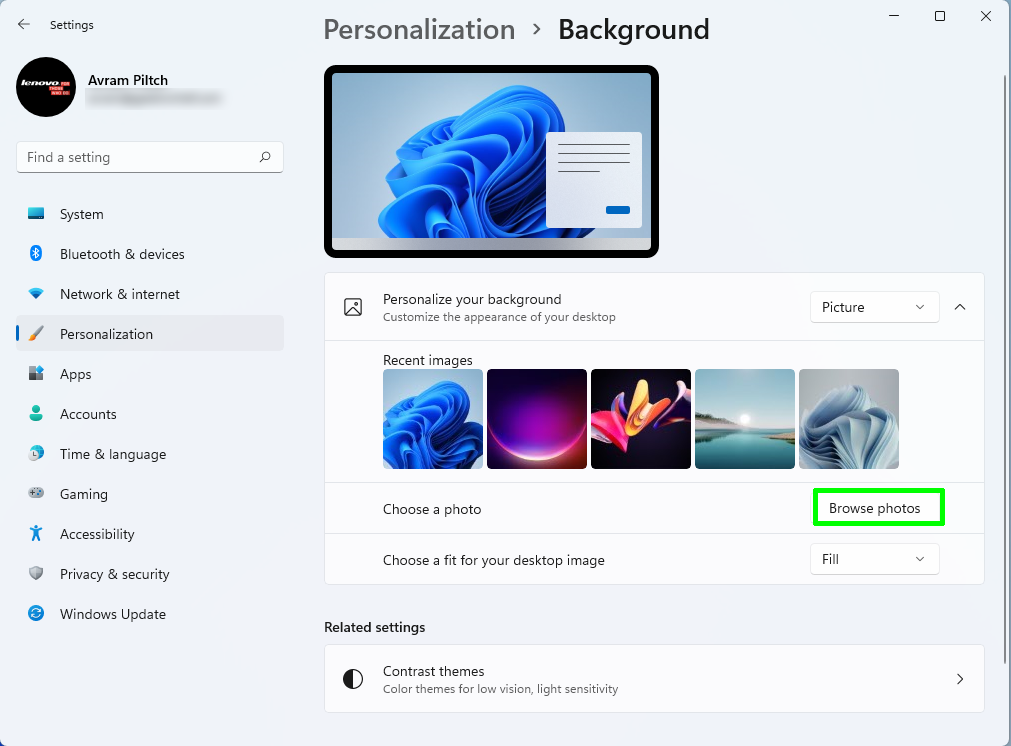
The background will now look like standard Windows 10.
How to Get the Windows 10 Recycle Bin in Windows 11
The Windows 10 look and feel would not be complete without using the same recycle bin icon. To be honest, the Windows 11 recycle bin doesn't look radically different from the old version, but it is a slightly different angle that shows a head-on view of the bin rather than the original, three-quarter view.
Fortunately, you can get the Windows 10 recycle bin icon back, provided that you still have access to a copy of Windows 10 to copy the relevant file from.
1. Grab the imageres.dll.mun file from the C:\Windows\SystemResources folder on a Windows 10 PC.
2. Copy the file to your Windows 11 PC and make sure you put it somewhere you plan to keep it permanently. If you move, rename or delete this file after choosing an icon, you'll get a blank icon on your desktop.
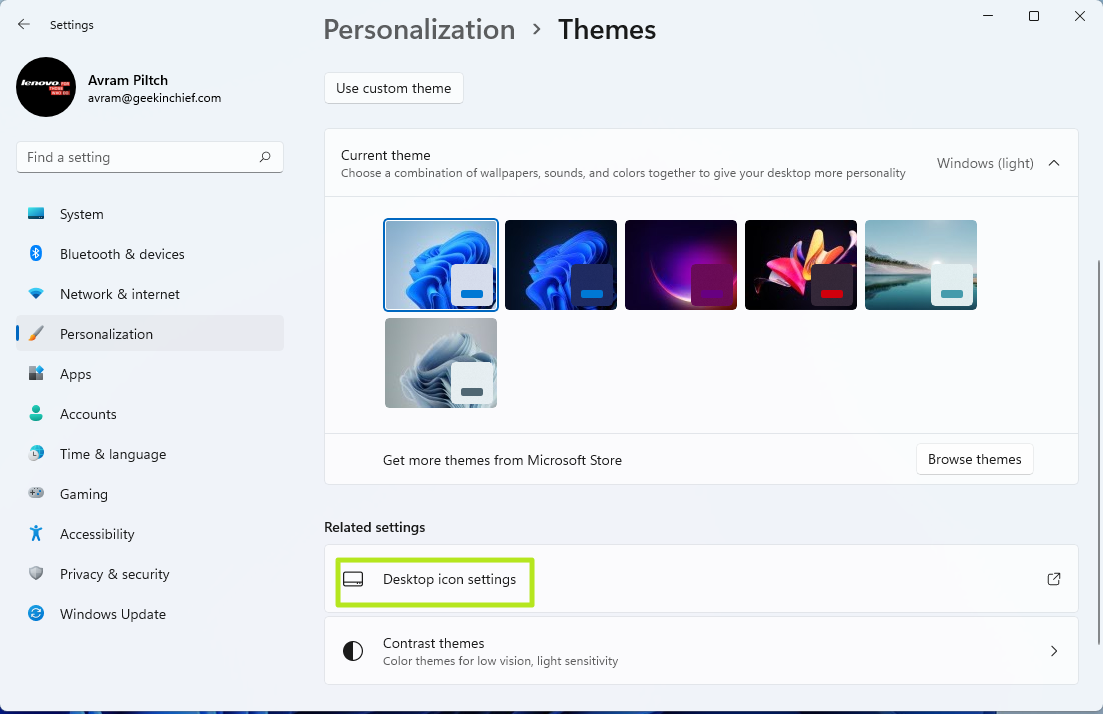
3. Right click on the desktop and select Personalize.
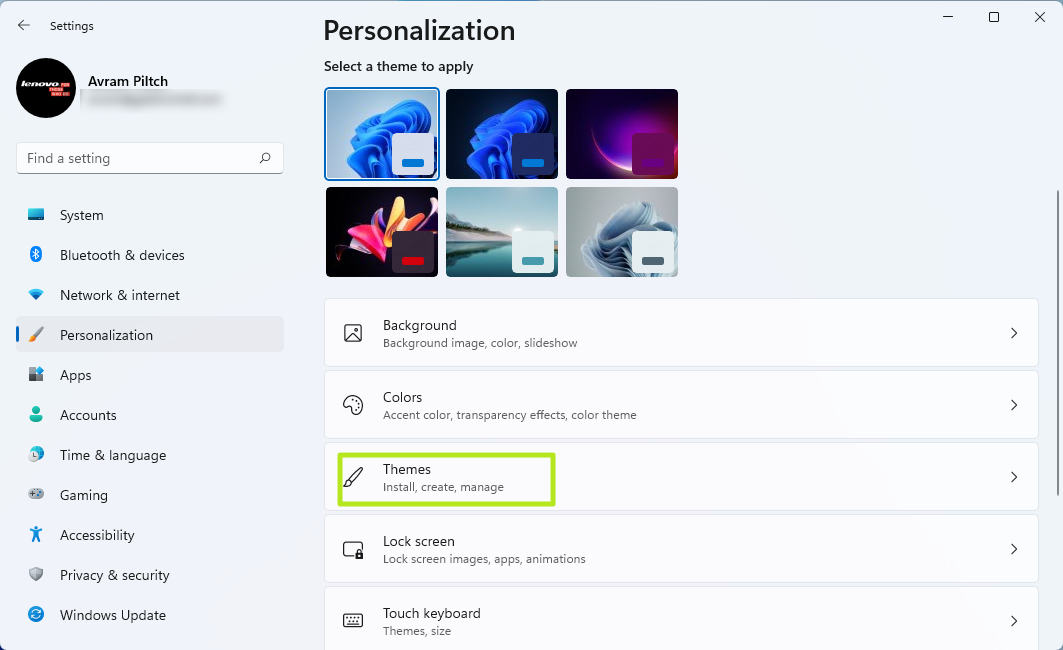
4. Open the Themes submenu.
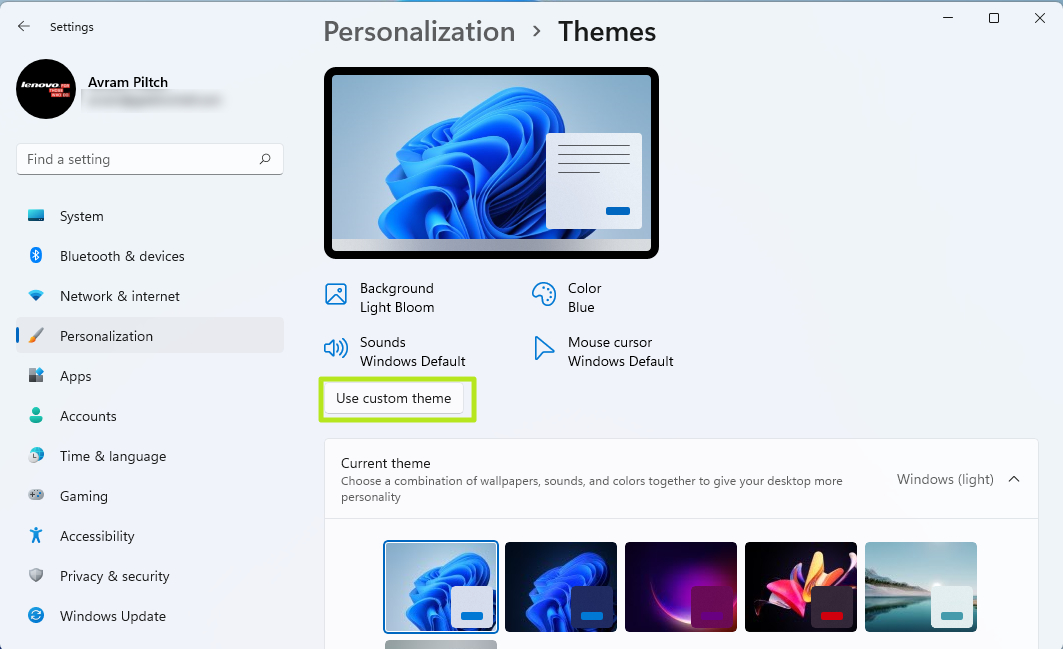
5. Click "Use custom theme."
6. Click Desktop icon settings.
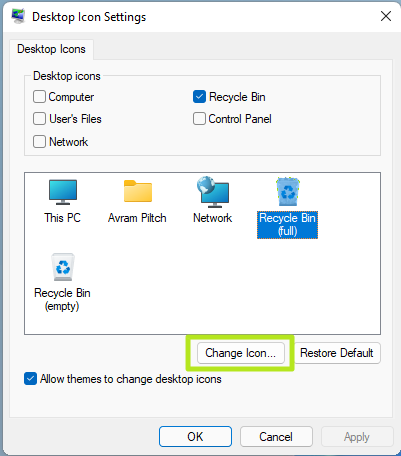
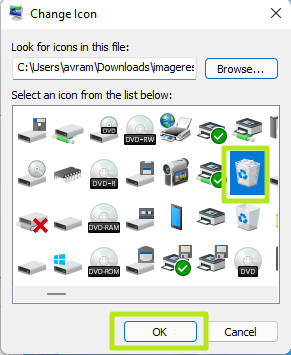
7. Select "Recycle Bin (full)" and click Change Icon.
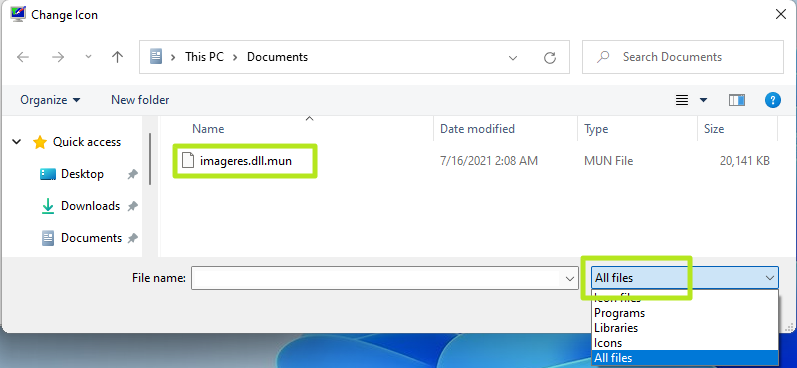
8. Click the Browse button and select the imageres.dll.mun file from its location.
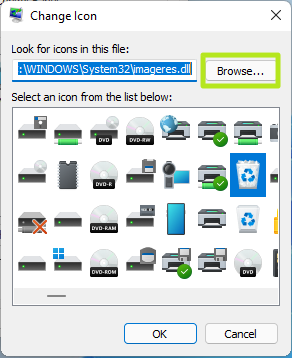
Note that you'll need to pull down "All Files" selector in the dialog box or you may not see the file listed.
9. Pick the icon of the full recyle bin and click Ok.
10. Repeat this process for "Recyle Bin (empty)".
11. Click Ok on the Desktop Icon Settings menu.
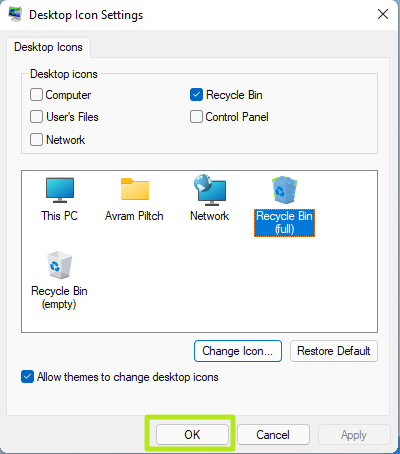
Now your Recycle bin icons should be changed. You can always get the old ones back by highlighting them and clicking the Restore Default button.

By following all of these steps, you can a Windows 11 interface that looks and feels a lot more like Windows 10, along with some of the functionality you might miss the most. Unfortunately, there's no guarantee that all of these hacks keep working as new Windows 11 builds get released.
How to Look for a File in Windows 10
Source: https://www.tomshardware.com/how-to/windows-11-look-like-windows-10
0 Response to "How to Look for a File in Windows 10"
Post a Comment